Events are used to send notifications when one or more variables meet a condition established by the user. So, in this post, we will show how to “create” and “edit” an event on Bindelo Central.
First, the event is created to be triggered when several temperature-sensors detect a temperature over a previously fixed threshold, there is only need that one of the sensors to measure temperature over the threshold to trigger the event.
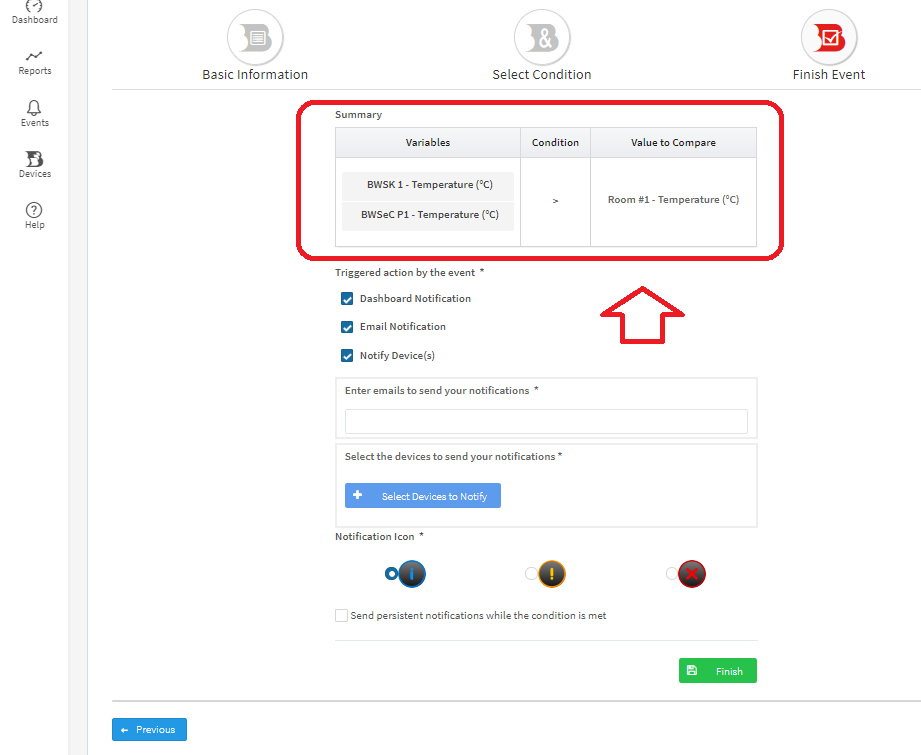
The event will send a notification in several ways at the same time: Dashboard, email, and other device action. After, the event is edited and changed to be triggered by comparing the readings from 2 sensors against a 3rd sensor. Let’s start from the beginning.
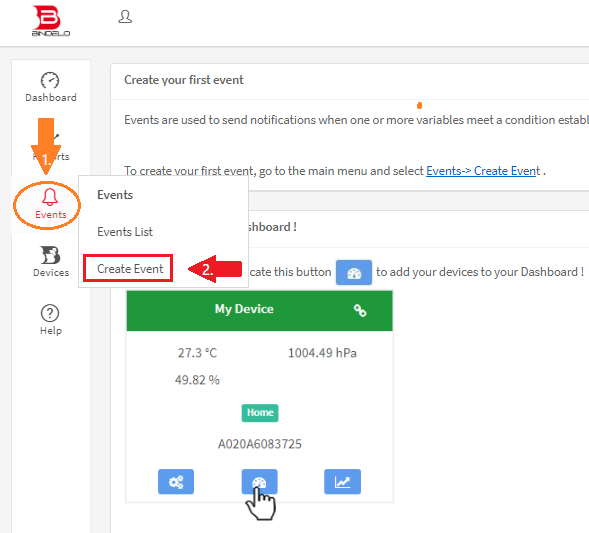
On the main menu go to Events and then click Create Event.
Then you will be asked to enter the basic information for the new event like you did while you wanted to create a report.
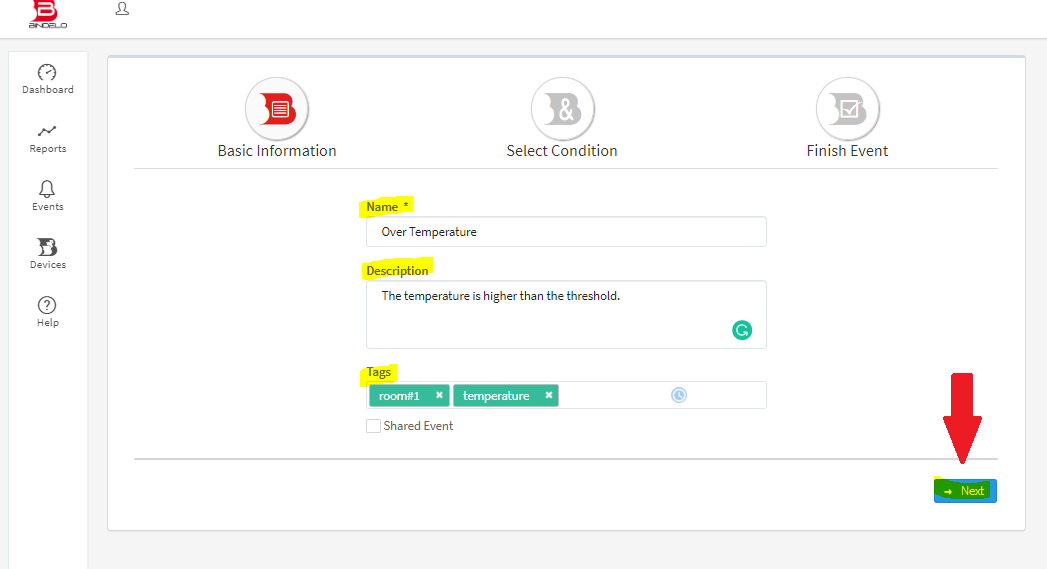
- The “Name” field will be shown as the event title.
- The “Description” field you may enter a text to describe your event, this is an optional field.
- The “Tags” field is useful to group or classify your events. Also, will make easier to search for the report later.
- And the “Shared Event” checkbox allows you to share the event within the other users of the same Bindelo account.
Now, click on the “Next” button.
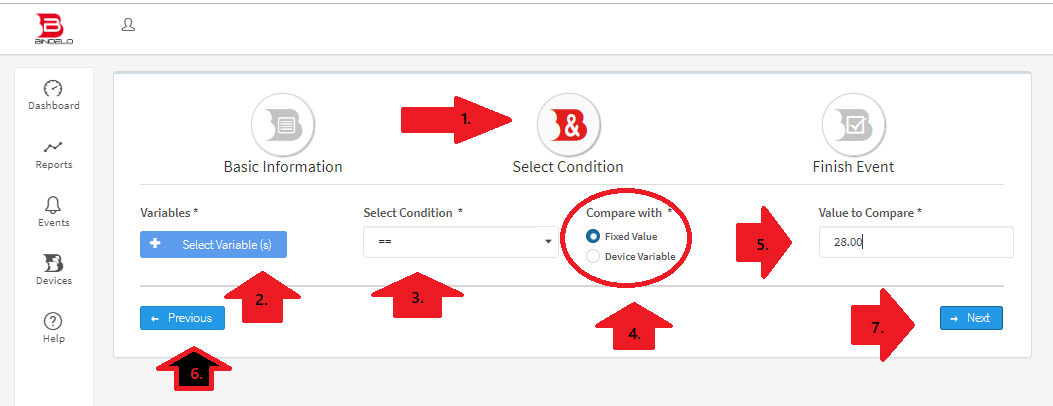
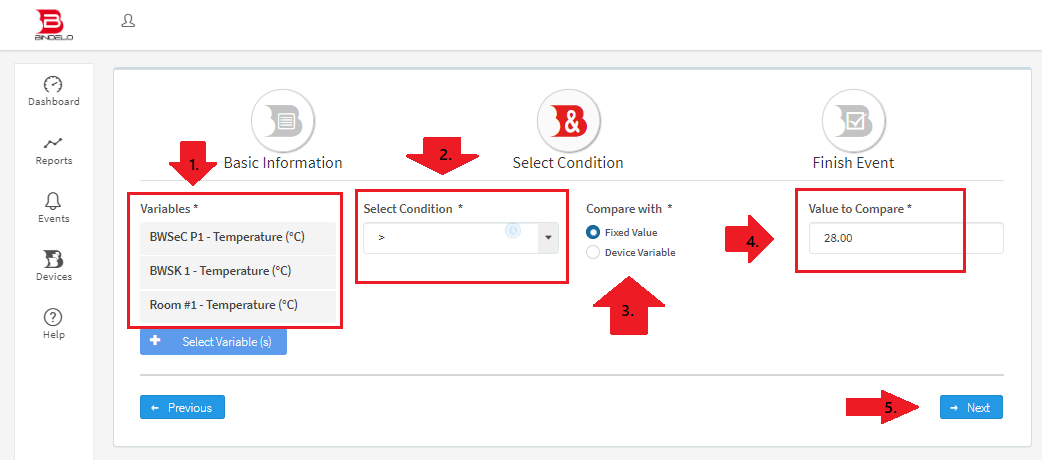
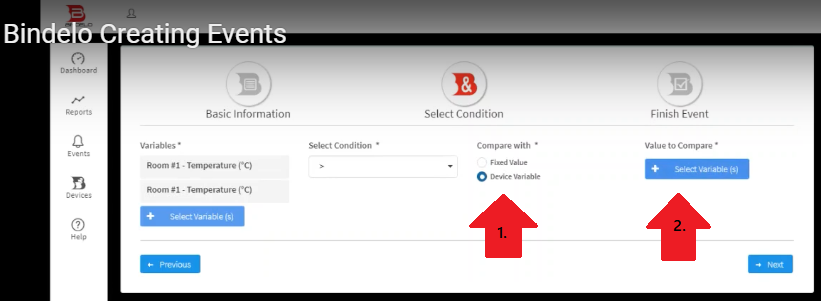
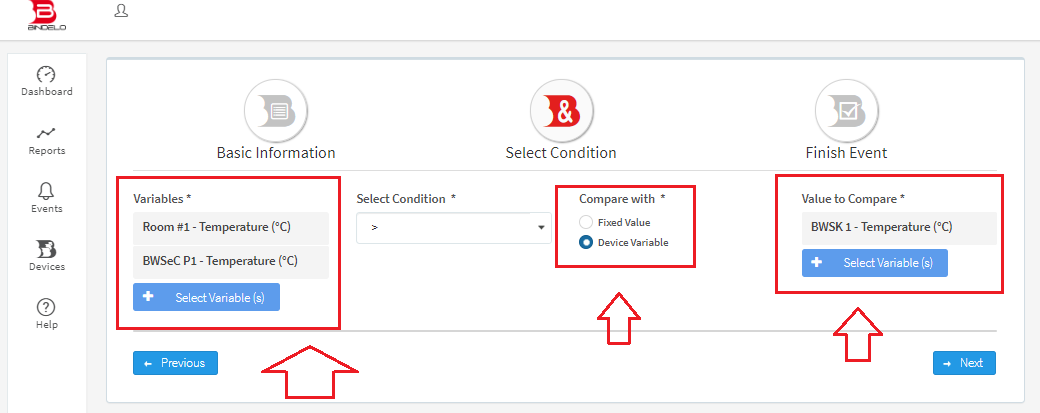
After finish with the basic event information, you will find the “Select Condition” tab (numbered 1 on the above picture). Here:
2. You have to click on “Select Variables” first. (we have discussed it down below)
3. Choose your preferred condition among equal to (=), More than (>), and Less than (<).
4. Select the condition by which you want to measure the value. Please note, there are two ways to trigger the event:
i) By comparing the sensor or sensor against a fixed threshold. Or,
ii) By comparing one or multiple sensors against another sensor.
We will show both in this article.
5. When you choose to compare with a fixed threshold, this option will appear here named “Value to Compare”. You can use any value you want. But I put the value 28, for example.
6. You can go back to the previous screen by clicking on the “Previous” button if you need to edit anything on the previous screen.
7. If you don’t have, then click on the NEXT button. (but, before clicking this button, you have to go back to step number 2 again.
Click on “Select Variables” first and then you will see the following screen. You have to select your devices first.
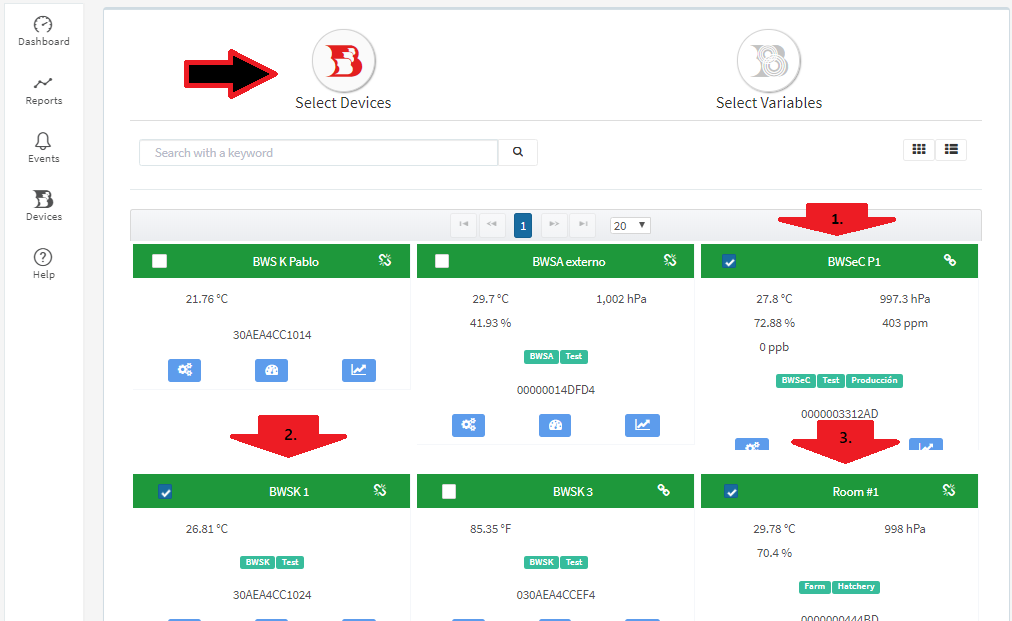
All of your devices are listed here, you have to select which of them will be included in the event. You may use the search field to enter the name or the tags of the device you wish to include in the event. Select at least 1 sensor from the list here, (but I wanted to take the reading from 3 devices just to give it more contrast) and click the NEXT button. It will take you to the “Select Variables” tab. See the following image.
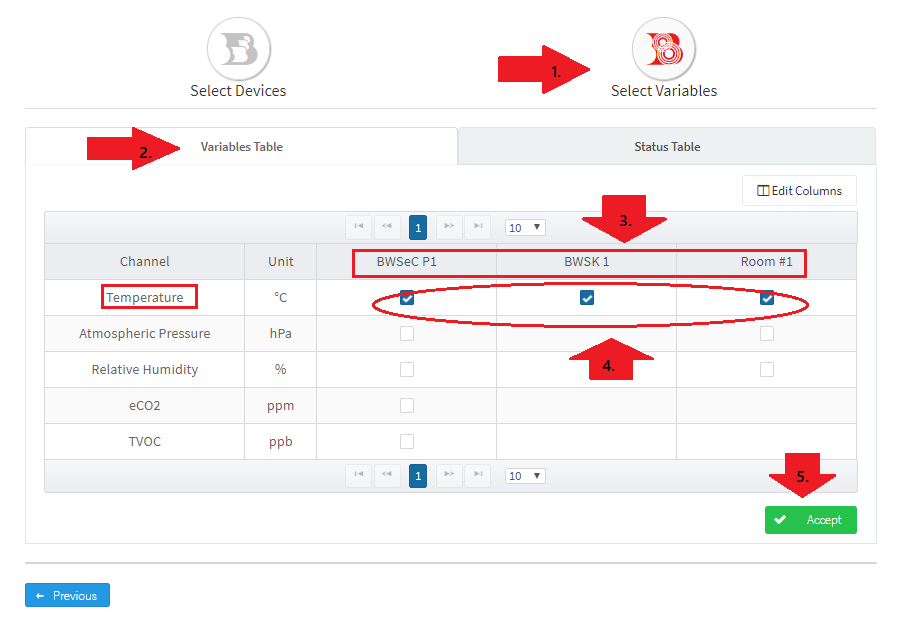
Once you click next, the above screen will appear. Now please notice the red marks here.
- You are in Select Variables.
- And you are in Variable Table in this tab.
- You can see those 3 device names are showing here as we have selected these on the previous screen. I have selected the Channel “Temperature” and “Celcius” as the unit. Please note, the temperature is the only one of many variables that Bindelo can measure. You can also tick on the other channels too, such as “Atmosphere Pressure, Relative Humidity, eCo2, and TVOC – if you want.
- Tick all the 3 boxes here.
- And then click on the ACCEPT button.
Now we have selected all the variables and we are set to go to the next screen.
- We can see all the variables we have selected previously.
- Select the condition as More Than sign (>)
- Will remain the same.
- Will remain the same. (28)
- Click NEXT. And you will see the following screen.
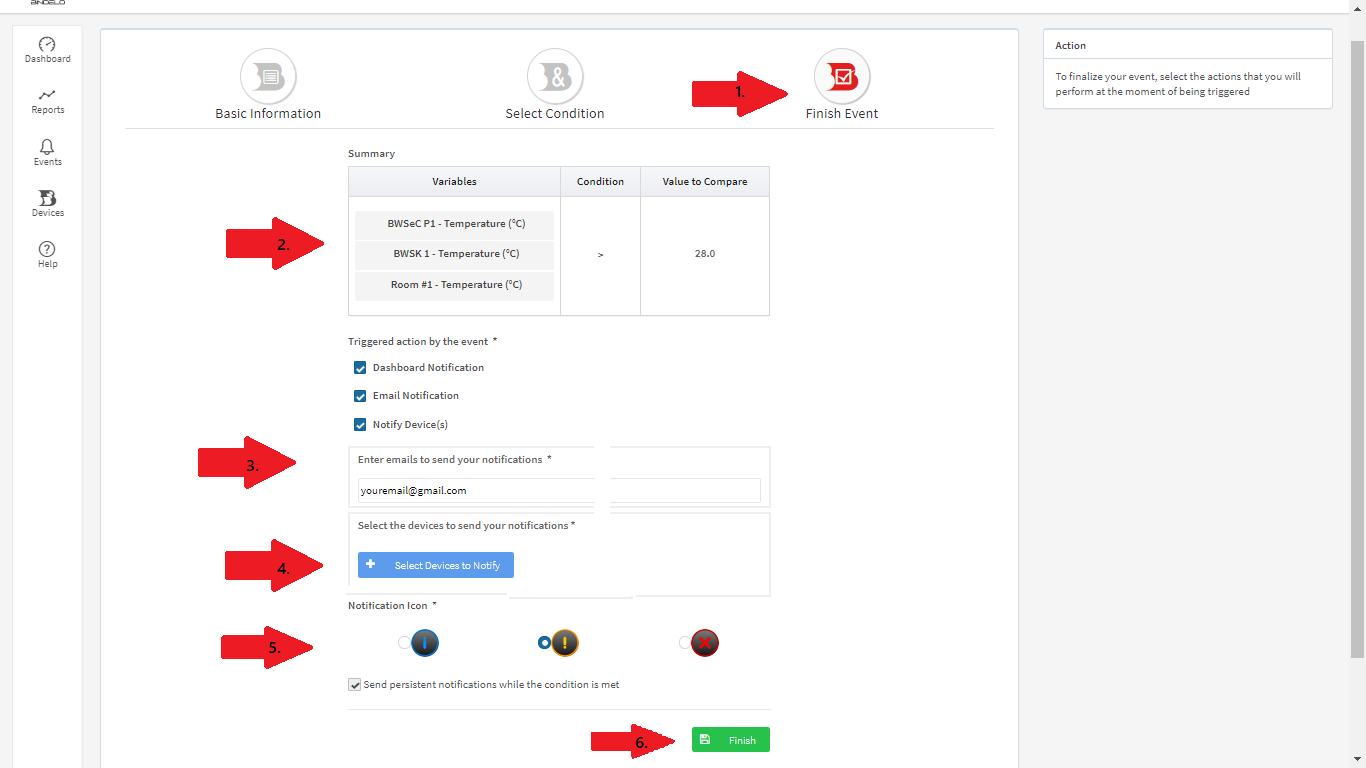
- You are here.
- All the device is listed here.
- Tick the notification type and enter your email address if you want to receive the event notification via email. For the email notification, you can enter one or more email address or just the name of a user within the Bindelo Central account, you can enter more than one email address, just hit enter after each one to be included in the recipient list.
- Select the device. (see the following image)
- Select your choice of the notification icon. If you want to receive a notification every time when a record meets the condition then tick the “Send persistent notifications while the condition is met” checkbox. If this checkbox is not checked you will only receive a single notification when the condition is met.
- Click on the Finish button.
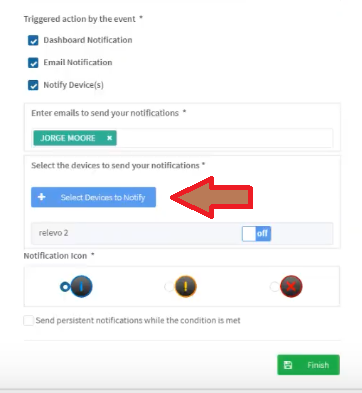
Select the device to get the notifications on.
Once you click the Finish button, the following window will appear.
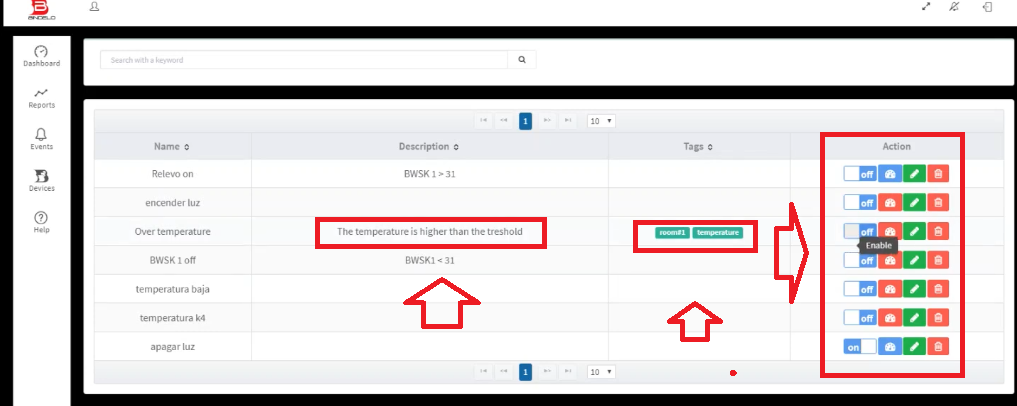
You will see the device name and its temperature status based on your selected preferences. You can also toggle the value of the actions on the right-hand side of the screen. Please click on each of the buttons to check its functions.
Now, we will show how to create an event using the 2nd way, which is – by comparing with other sensors.
Click on the “Select Variables”. 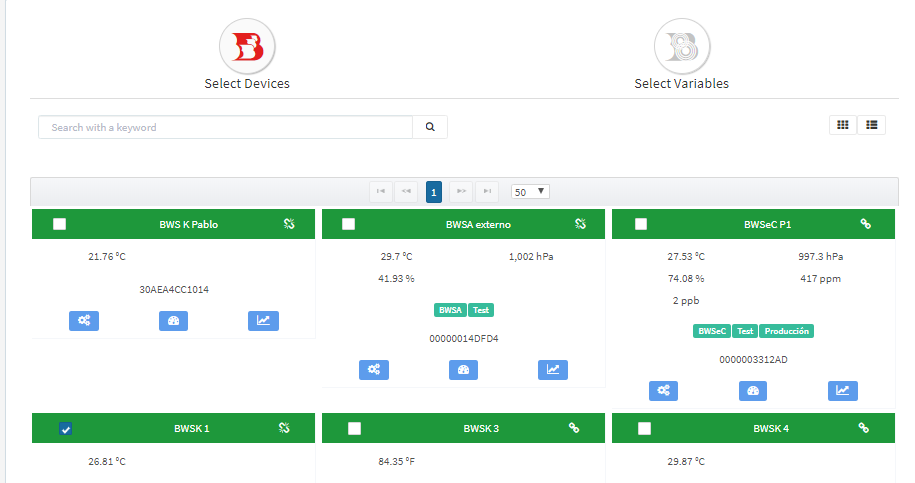
Choose any one device from this list. 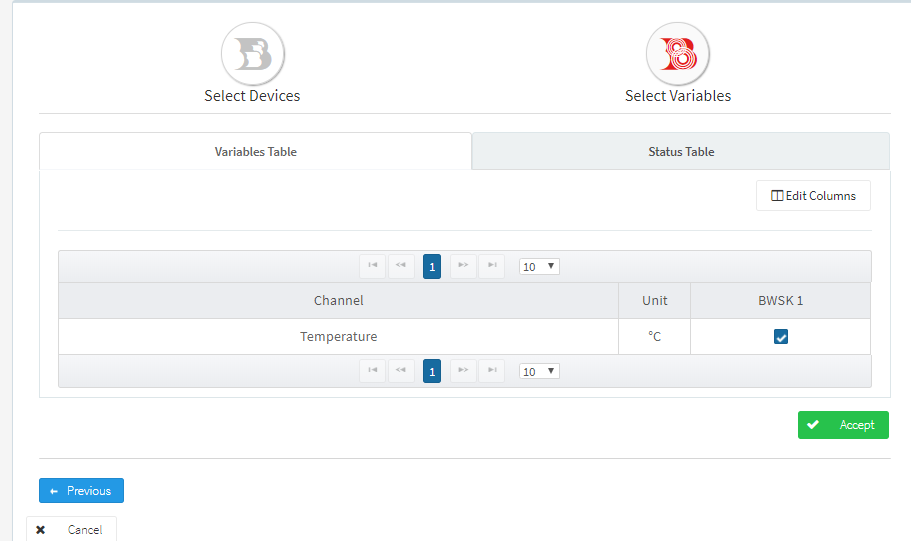
Select the device. Tick here. And click on “Accept”. And notice to below image.
The Variables, Compare with and value to compare – all of these value you got now. Now click NEXT.
After clicking the NEXT, you will see this window, all the things here are the same just like the previous one except for the rectangular red box. Now, click on FINISH.
Thus you will be able to create and edit an event to get notifications. If you still have trouble creating an event, please feel free to contact us at any time.